Simple Starter Example
So you want to build a bitcoin wallet using BDK. Great! Here is the rough outline of what you need to do just that. A standard, simple example of a bitcoin wallet in BDK-land would require 3 core pillars:
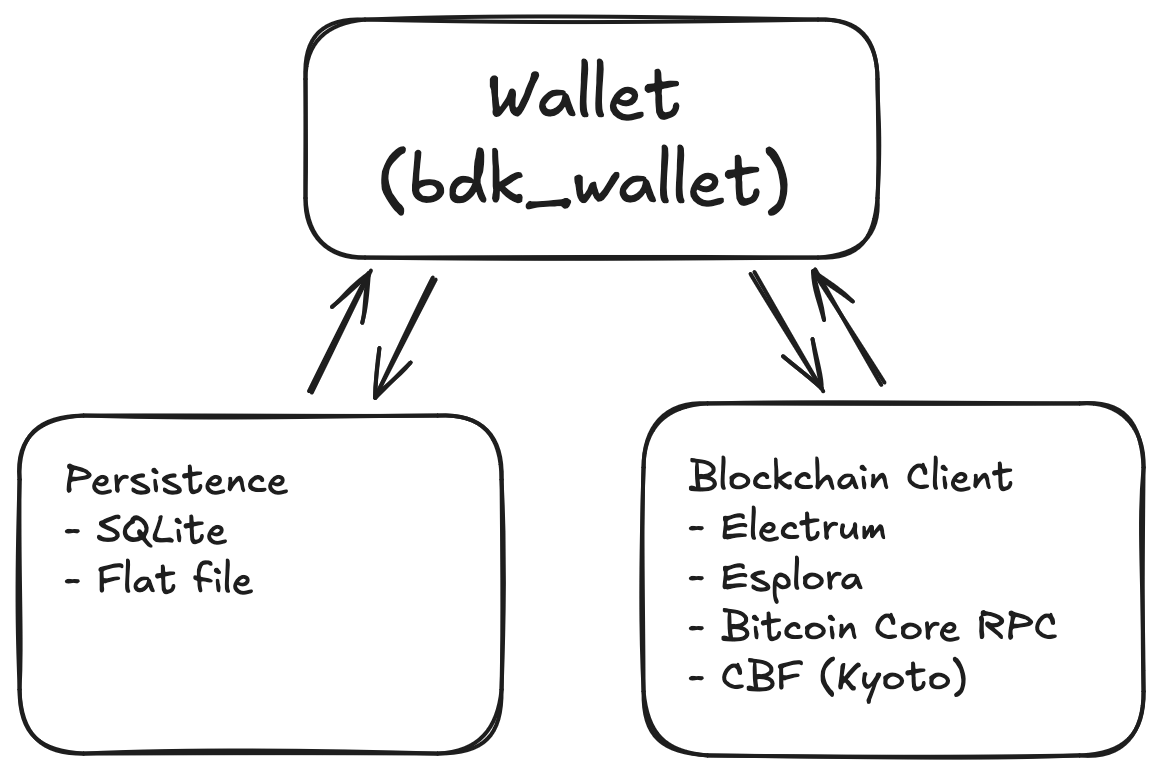
- The
bdk_walletlibrary, which will provide two core types: theWalletand theTxBuilder. This library will handle all the domain logic related to keeping track of which UTXOs you own, what your total balance is, creating and signing transactions, etc. - A blockchain client. Your wallet will need to keep track of blockchain data, like new transactions that have been added to the blockchain that impact your wallet, requesting these transactions from a Bitcoin Core node, an Electrum or Esplora server, etc.
- A persistence mechanism for saving wallet data between sessions (note that this is not actually required). Things like which addresses the wallet has revealed and what is the state of the blockchain on its last sync are things that are kept in persistence and can be loaded on startup.
Diving in!
This page provides a starter example showcasing how BDK can be used to create, sync, and manage a wallet using an Esplora client as a blockchain data source. Familiarity with this example will help you work through the more advanced pages in this section.
You can find working code examples of this example in three programming languages: Rust, Swift, and Kotlin. (Note: some additional language bindings are available for BDK, see 3rd Party Bindings).
Tip
To complete this example from top to bottom, you'll need to create new descriptors and replace the ones provided. Once you do so, you'll run the example twice; on first run the wallet will not have any balance and will exit with an address to send funds to. Once that's done, you can run the example again and the wallet will be able to perform the later steps, namely creating and broadcasting a new transaction.
Create a new project
Add required dependencies
[package]
name = "starter-example"
version = "0.1.0"
edition = "2021"

[dependencies]
bdk_wallet = { version = "2.2.0", features = ["rusqlite"] }
bdk_esplora = { version = "0.22.1", features = ["blocking"] }
Use descriptors
To create a wallet using BDK, we need some descriptors for our wallet. This example uses public descriptors (meaning they cannot be used to sign transactions) on Signet. Step 7 and below will fail unless you replace those public descriptors with private ones of your own and fund them using Signet coins through a faucet. Refer to the Creating Descriptors page for information on how to generate your own private descriptors.
Warning
Note that if you replace the descriptors after running the example using the provided ones, you must delete or rename the database file or will get an error on wallet load.
let descriptor: &str = "tr([12071a7c/86'/1'/0']tpubDCaLkqfh67Qr7ZuRrUNrCYQ54sMjHfsJ4yQSGb3aBr1yqt3yXpamRBUwnGSnyNnxQYu7rqeBiPfw3mjBcFNX4ky2vhjj9bDrGstkfUbLB9T/0/*)#z3x5097m";
let change_descriptor: &str = "tr([12071a7c/86'/1'/0']tpubDCaLkqfh67Qr7ZuRrUNrCYQ54sMjHfsJ4yQSGb3aBr1yqt3yXpamRBUwnGSnyNnxQYu7rqeBiPfw3mjBcFNX4ky2vhjj9bDrGstkfUbLB9T/1/*)#n9r4jswr";
These are taproot descriptors (tr()) using public keys on Signet (tpub) as described in BIP86. The first descriptor is an HD wallet with a path for generating addresses to give out externally for payments. The second one is used by the wallet to generate addresses to pay ourselves change when sending payments (remember that UTXOs must be spent in full, so you often need to make change).
Create or load a wallet
Next let's load up our wallet.
// Initiate the connection to the database
let mut conn = Connection::open(DB_PATH).expect("Can't open database");

// Create the wallet
let wallet_opt = Wallet::load()
    .descriptor(KeychainKind::External, Some(descriptor))
    .descriptor(KeychainKind::Internal, Some(change_descriptor))
    // .extract_keys() // uncomment this line when using private descriptors
    .check_network(Network::Signet)
    .load_wallet(&mut conn)
    .unwrap();

let mut wallet = if let Some(loaded_wallet) = wallet_opt {
    loaded_wallet
} else {
    Wallet::create(descriptor, change_descriptor)
        .network(Network::Signet)
        .create_wallet(&mut conn)
        .unwrap()
};
Sync the wallet
Now let's build an Esplora client and use it to request transaction history for the wallet.
// Sync the wallet
let client: esplora_client::BlockingClient =
    Builder::new("https://blockstream.info/signet/api/").build_blocking();

println!("Syncing wallet...");
let full_scan_request: FullScanRequestBuilder<KeychainKind> = wallet.start_full_scan();
let update: FullScanResponse<KeychainKind> = client
    .full_scan(full_scan_request, STOP_GAP, PARALLEL_REQUESTS)
    .unwrap();

// Apply the update from the full scan to the wallet
wallet.apply_update(update).unwrap();

let balance = wallet.balance();
println!("Wallet balance: {} sat", balance.total().to_sat());
In cases where you are using new descriptors that do not have a balance yet, the example will request a new address from the wallet and print it out so you can fund the wallet. Remember that this example uses Signet coins!
if balance.total().to_sat() < 5000 {
    println!("Your wallet does not have sufficient balance for the following steps!");
    // Reveal a new address from your external keychain
    let address: AddressInfo = wallet.reveal_next_address(KeychainKind::External);
    println!(
        "Send Signet coins to {} (address generated at index {})",
        address.address, address.index
    );
    wallet.persist(&mut conn).expect("Cannot persist");
    exit(0)
}
Send a transaction
For this step you'll need a wallet built with private keys, funded with some Signet satoshis. You can find a faucet here to get some coins.
Let's prepare to send a transaction. The two core choices here are where to send the funds and how much to send. We will send funds back to the faucet return address; it's good practice to send test sats back to the faucet when you're done using them.
// Use a faucet return address
let faucet_address =
    Address::from_str("tb1p4tp4l6glyr2gs94neqcpr5gha7344nfyznfkc8szkreflscsdkgqsdent4")
        .unwrap()
        .require_network(Network::Signet)
        .unwrap();

let send_amount: Amount = Amount::from_sat(1000);
Here we are sending 5000 sats back to the faucet (make sure the wallet has at least this much balance, or change this value).
Finally we are ready to build, sign, and broadcast the transaction:
let mut builder = wallet.build_tx();
builder
    .fee_rate(FeeRate::from_sat_per_vb(4).unwrap())
    .add_recipient(faucet_address.script_pubkey(), send_amount);

let mut psbt: Psbt = builder.finish().unwrap();

let finalized = wallet.sign(&mut psbt, SignOptions::default()).unwrap();
assert!(finalized);

let tx = psbt.extract_tx().unwrap();
client.broadcast(&tx).unwrap();
println!("Transaction broadcast! Txid: {}", tx.compute_txid());
We can view our transaction on the mempool.space Signet explorer.